The best part, this incredibly delicious and flavorful recipe comes together in about 30 minutes and is way better than takeout!
This is my version of Thai Basil chicken which, by the way, is quite different from the authentic Thai Basil chicken recipe that you eat in Thai restaurants. And today’s dish – Thai Basil chicken perfectly fits the bill. It’s quick, easy, and a perfect dish to cook when you’re short on time. As compared to sweet Thai basil (Horapa), Holy Thai basil has small narrow leaves, purple stems, and purple flowers. These leaves have a strong flavor, are slightly spicy, and have a licorice-like flavor. Holy Thai basil leaves will release their full flavor and scent when cooked. Therefore, it’s often added to stir-fries and meat-based recipes. The addition of Holy Thai basil leaves takes the dish to a whole new level.
What does Pad Krapow Gai stand for?
In Thai, Pad translates to stir-fired, Krapow is the holy Thai basil, and Gai means chicken. So basically, it means – Stir-fried basil chicken. There are many variations of Pad Krapow, depending on the type of protein used in the recipe.
Pork – its called Pad Krapow Mu Prawns – its Pad Krapow Kung Mushrooms – its Pad Krapow Het.
» Sesame Oil – it adds a nice nutty flavor to Thai basil chicken recipe. But you can use olive oil if that’s what you have on hand. » Chicken – I chose sliced chicken breast for Thai basil chicken. But you can use ground chicken or bite-sized chicken pieces too. Ground chicken will cook up quickly. » Bell pepper – I have used thinly sliced red bell pepper. But you can add any color of peppers that you like. » Green beans- sliced. Not a fan of green beans, use sliced mushrooms instead. » Onions – you can use white or yellow onions too. » Garlic – use fresh garlic for more flavor. Fresh garlic can be swapped with jarred garlic paste. » Thai Chilies – you can use fresh green chilies too. But if you are not a fan of spicy chicken, feel free to omit it. » Holy Thai Basil leaves – this is where all the flavor comes from. » Vegetarian Oyster sauce – an essential ingredient in Thai food. I have used the mushroom-flavored vegetarian oyster sauce. » Tamari – If not gluten-allergic, you can use low sodium soy sauce instead. » Vegan Fish sauce – it’s a great sauce made up of dried shiitake mushrooms and soy sauce. Again a key ingredient in Thai cuisine. » Brown sugar – balances the salt in this recipe. Furthermore, the addition of brown sugar perfectly balances out the sweet and spicy flavors. 2. Combine vegetarian oyster sauce, tamari, vegan fish sauce, and brown sugar in a mixing bowl. Whisk to combine. Set aside. Saute the chicken- 3. Heat oil in a skillet. Add the chicken. 4. Cook for 3-4 minutes until it starts to brown and no longer pink. Use a spoon to move around the chicken so that it’s evenly cooked.
Once done, remove from heat and set aside. Next up, Sauté the veggies-
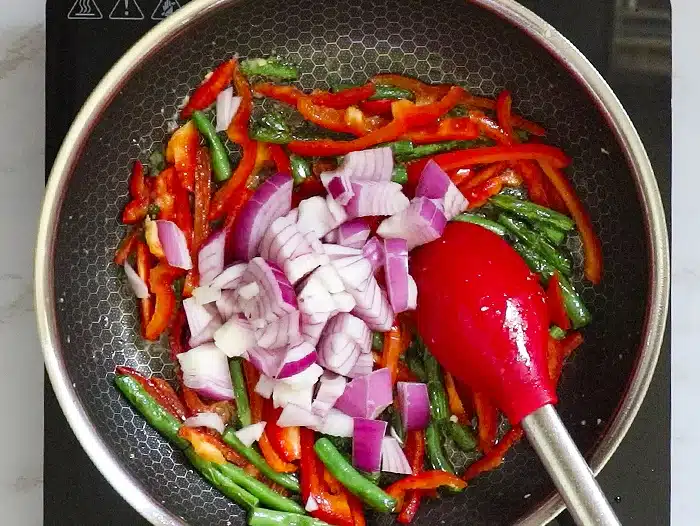
Heat sesame oil in the same skillet.
Add green beans to the skillet and cook for 4-5 minutes, stirring them occasionally.
Once the green beans are fork-tender, add bell peppers, and garlic to the skillet.
Stir in onions.
Cook for additional 3-4 minutes until the onions begin to soften. Assemble Thai Basil chicken
Return the chicken to the skillet. Move the chicken and veggies to the side of the skillet.
Cook for another 2 minutes until the sauce starts to thicken.
Remove the skillet from heat. Add chopped green onions and Thai Basil leaves.
Give it a toss. Transfer Thai basil chicken to a bowl and serve hot. Or you can serve this Thai Basil chicken the authentic way – over a bed of hot rice, fried egg – garnished with some fresh basil leaves and green onions.
Some great options are –
Shredded carrots Broccoli florets Snap peas Mushrooms Cabbage Asparagus
Is this Thai Basil chicken recipe extremely spicy?
This recipe made as-is is relatively mild. But you can always scale the recipe up or down on the spice level to suit your tastes buds.
How to store leftovers?
Thai basil chicken will store well in the refrigerator for 3-4 days in an airtight container. When ready to serve again, reheat in the microwave until just heated through. Let me know in the comments when you make it. Feel free to contact me with any questions or inquiries, and I would be happy to answer them.
Craving for more authentic Asian recipes? Try these-